Friday, August 31, 2007

TOMATO BASIL BISQUE


A friend gave me a can of imported Italian tomatoes, so I made one of my favorite soup recipes, tomato basil bisque. I've been making this for years. It's pretty forgiving. You can put carrots and celery in or leave them out, you can put more onions in, or less. It'll still taste good. As long as you have good-quality tomatoes. You can make it with just cream cheese, or with cream cheese and cream or half-and-half.

Tomato Basil Bisque
1/2 -3/4 cup chopped onion
1/2 cup chopped celery (optional)
1 large garlic clove, crushed and chopped
1/2 cup chopped carrot (optional)
1/4 cup olive oil or Smart Balance buttery spread
1 28-oz. can whole peeled tomatoes and juice
1 quart chicken broth
1 6-oz. can tomato paste
1-2 cups fresh good-quality tomatoes if you have them -- these are optional
1/2 tsp. sea salt (or more, if you prefer)
1/8 tsp. white pepper (or black if you prefer)
1/4 cup chopped fresh basil (or 1-1/4 Tbsp. dried)
1 Tbsp. fresh oregano (or 1 tsp. dried) (optional)
1 Tbsp. fresh thyme (or 1 tsp. dried) (optional)
2 Tbsp. fresh parsley (or 2 tsp. dried) (optional)
2 bay leaves
4 oz. Neufchatel cheese, softened, cut in cubes
12 oz. fat free half and half

Saute the chopped vegetables and garlic over medium heat in the oil till golden and transparent. Add the tomatoes, broth and tomato paste, chopping the tomatoes as they go in and stirring everything well to combine. Bring to a low boil, add the seasonings and herbs, stir again, cover and reduce heat to a simmer. Cook for 45 minutes - 1 hour, checking it now and then to be sure it isn't sticking on the bottom. Add the Neufchatel cheese, and stir till combined. Turn heat off, and be sure soup is not boiling when you add the half and half, or it couldl curdle, especially if it's not Land o' Lakes.


Garnish the soup as desired (chopped chives, sprigs of parsley or basil, croutons, or sour cream). I like mine plain. You can puree this in the blender or food processor if you like smooth soup. I leave it slightly chunky because I like that texture. This will give you about 2 to 2-1/2 quarts of soup and it freezes wonderfully! I usually freeze one quart and keep one quart in the fridge which we eat up within a few days. You can also serve it plain without the cream cheese and cream if you prefer. Use the very best tomatoes you can afford.



Wednesday, August 29, 2007

DOCTORING CAKE MIXES AND PREPARED FROSTINGS

Once you start baking from scratch, cake mixes become almost repulsive. But, let's face it. It's almost impossible to completely live without them. Especially when the store puts them on sale for the price of the coupon you are carrying, making them free. Hence, my pantry has several cake mixes and one tub of chocolate frosting nearing expiration dates. What to do? Well doctor them, that's what!

Now I know you can't make a cake healthy no matter what you do. If it has white flour and white sugar it isn't healthy, period. But you have to do what you can to make it less UNhealthy. So I always try to lower the fat, if possible, and put anything in that might be close to healthy as long as it doesn't kill the recipe. (I went on a binge several years ago where I only made recipes with whole wheat flour, etc., etc. and no one would eat my desserts, including me. So I finally decided that the key is moderation. Enjoy the desserts but don't overdo it. Now the changes I make are usually unnoticed.) One change I like to make is to substitute Smart Balance buttery spread for butter. Smart Balance has the good fats in the proper balance, and it has a buttery taste. It contains olive oil. The other change I like to make whenever baking cakes is to substitute unsweetened applesauce for part of the fat in the recipe. I buy the little tubs that come in a package of 6, and always add them at the end of the mixing process.

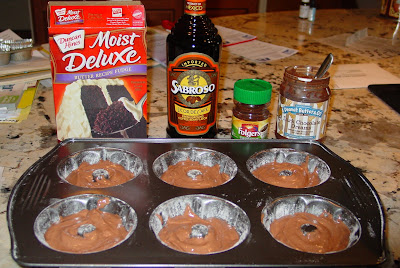
Those of you on the west coast have PBLoco for peanut butter concoctions. Here on the east coast, it's Peanut Butter & Co. (ilovepeanutbutter.com). I have just recently discovered Dark Chocolate Dreams, made by Peanut Butter & Co. You can buy it from their website for something like $6.00/jar, or you can buy it from Wal-Mart for $3.34 a jar. They have other flavors as well, but Dark Chocolate Dreams is the one that caught my eye. I guess it's America's answer to Nutella, the European chocolate-hazlenut confection that everyone is so crazy about. I made a really good cheesecake with Dark Chocolate Dreams and submitted the recipe to betterrecipes.com. It was rated 5 stars and given a good review, but I didn't win. I'll post that recipe in a later blog. Since I still had half a jar left, I thought it would be good in the cake and frosting. I wasn't wrong. Combined with the coffee flavors from the coffee brandy and instant coffee granules, this was a winner. The peanut butter flavor is subtle and goes really nicely with the chocolate and the coffee. I gave all the mini-bundt cakes away and some of the mini cupcakes, but I kept some standard mini cupcakes to snack on, because they're really good. The recipe is below. I'm categorizing my recipe archives now, -- see the upper right sidebar -- thanks to Erika of tummytreasures.blogspot.com.

DARK CHOCOLATE DREAMS CAKE AND FROSTING


INGREDIENTS: 1/4 cup water
1 Tbsp. instant coffee granules (decaf ok)
1 box Duncan Hines Butter Recipe Fudge cakemix
1/2 cup coffee brandy (Kahlua or generic) or strong coffee
2 Tbsp. Smart Balance buttery spread (or butter or margarine)
3 large eggs
1/3 cup Dark Chocolate Dreams
1 little tub (4 oz.) applesauce, unsweetened

FROSTING: 1 tub any chocolate frosting
1/2 cup Dark Chocolate Dreams
2-3 Tbsp. coffee brandy or strong coffee

DIRECTIONS: Have all ingredients at room temperature before starting. Preheat oven to 375 degrees (350 for dark or coated pans). Grease sides and bottom of each pan with shortening and flour lightly or use baking cups for cupcakes. First, dissolve instant coffee granules in water. Blend all cake ingredients except applesauce at low speed until moistened (about 30 seconds). Beat at medium speed for 3 minutes. Add applesauce. Beat at medium speed for 1 minute. Pour batter in pans and bake immediately. See back of DH cake mix box for sizes and times.
(Tip for getting all the coffee brandy out of the measuring cup: Empty the coffee then crack the eggs in the measuring cup. The eggs will "clean out" the cup.)

For frosting, mix all ingredients by hand or with electric mixer till smooth and fluffy. Frost cakes.

Monday, August 27, 2007

FRESH COCONUT CAKES


My son, David, shares my love of baking. He started young with chocolate chip cookies. Now he is almost 35 and has progressed to baking fancy cheesecakes and coconut cream pies. After listening to him describe his coconut cream pies over the phone for the third time in two weeks, I started craving coconut cream pie. He doesn't live close enough to give me a piece, so when I was in our local Harris Teeter (a Southeastern upscale food store kind of like Kroger's) and my eye caught not one, but three different kinds of coconuts, on impulse I bought the young coconut that has a white shell. It's not totally soft like the ones you can scoop out, this one had a hard shell but it was white instead of brown. I took it home and followed the instructions for opening it. (I've done plenty of brown coconuts in my day, and I used to make a mean coconut cream pie, so this was not a hard thing to do.)

First, I poked holes in the eyes, and turned the coconut upside down over a strainer that was over a quart Pyrex measuring container. Plenty of juice came out -- more than a cup! Then I wrapped the coconut in a bath towel and banged the heck out of it with a hammer. The coconut meat loosened out of the shell when I put the point of a paring knife between the meat and the shell. I wiped any bits of shell or other debris off the meat with a damp paper towel. The meat was shredded in my Cuisinart, using the shredding disc.

Now about the recipe. It's from a 1965 paperback series of cookbooks from McCall's magazine. The one I used was entitled, "Book of Cakes and Pies," and there are some awesome recipes in it. I've used it over and over through the years. These little cakes were moist and full of coconut flavor and texture. Frosted with cream cheese icing, they were delicious.

Fresh Coconut Cake (or cupcakes)
Adapted from McCall's Book of Cakes and Pies
Rating: 9 out of 10

INGREDIENTS:
5 Tbsp. cornstarch + enough all-purpose flour to make 2-1/2 cups
3 tsp. baking powder
1/2 tsp. sea salt
1/2 cup Smart Balance buttery spread
1-1/3 cups sugar
1 cup fresh coconut juice (add milk if you don't have enough juice)
1 tsp. pure vanilla extract
1/4 tsp. coconut extract
1 cup grated fresh coconut
4 egg whites, room temperature

1. Heat oven to 350F. Grease and flour two 8" layer cake pans.
2. Sift flour with baking powder and salt; set aside.
3. In large bowl of electric mixer, at medium speed, beat SB until creamy. Gradually add 1 cup sugar, beating until very light and fluffy.
4. At low speed, beat in flour mixture (in fourths), alternating with milk (in thirds), beginning and ending with flour mixture; beat only until combined.
5. Stir in extracts and coconut.
6. In medium bowl, using clean, grease-free beaters, beat egg whites just until soft peaks form when beater is slowly raised.
7. Gradually add remaining 1/3 cup sugar, beating until stiff peaks form
8. With spatula, gently fold egg whites into batter, using an under-and-over motion, until well combined.
9. Turn into pans; bake 25-30 minutes, or until surface springs back when gently pressed with fingertip. You can also test with a wooden pick. If it returns with just a few crumbs, cake is done.
10. Let cool in pans 10 minutes. Remove from pans; cool completely on wire racks. Fill and frost as desired.

NOTE: I made this recipe in mini bundt pans (3 cup size), and baked for 15 minutes each. With the leftover batter, I made mini cupcakes, and baked them for 13 minutes. I frosted the cupcakes with cream cheese icing.

Sunday, August 26, 2007

LIMONCELLO


I promised you the Limoncello recipe, and here it is. I am totally amazed at how easy it is. First, I researched recipes on the internet and compared them. Almost everyone said to use the cheapest vodka available or Everclear which is 100% straight alcohol. I bought a bottle of cheap vodka and brought it home to start making the brew. My husband, Guy, looked at the bottle and asked, "What are you going to do with that 'rottka'?" He said he called it "rottka" because of its rotten quality and advised me to take it back to the liquor store and buy Smirnoff which is a mid-grade vodka. I did as I was told. The hardest part of the whole recipe is peeling the lemons, and that isn't so hard after all. The peeler I used is the one with the horizontal blade as above picture shows. First, you must scrub the lemons thoroughly in hot water to remove wax, etc. Also, cut out any blemishes or dark spots. Then, pointing the peeler down on the lemon and pulling up quickly and lightly, take off a small piece of peel. I've read posts that say to peel in a long strip and then take the pith (white part) off with a knife, but that sounds so time consuming. If you just pull the peel off in short pieces, no pith will come with it. I added an orange because the trend now is to make the Limoncello with Meyer lemons. Since we can't buy any Meyer lemons here in Eastern North Carolina, and we can't grow a Meyer lemon tree in our home (it's too dark), I thought adding an orange would give a similar result. (Meyer lemons are not true lemons -- they are actually a cross between a lemon and an orange. This is their main attraction -- they are milder than regular lemons. I wish we had a place to put one -- they are supposed to be easy to grow and are prolific producers, and they're not expensive -- about $40 will buy you a young Meyer lemon tree that will give you plenty of lemons within a year or two.) Any way, it must have worked. The combination of the Smirnoff and the orange mixed with the lemons and no pith on the peels produced luscious Limoncello. Too bad I don't drink because I could really enjoy this stuff! However, next batch I make is going to be with Everclear. I think if I just let it ferment longer it will be almost, if not as good as the Smirnoff. I am willing to chance it, but it will be later in the fall when I try it.


Here's the recipe as I made it.


LIMONCELLO LIQUEUR

10 lemons, scrubbed hard in hot water, blemishes and dark spots removed with knife

1 orange, scrubbed hard in hot water, blemishes and dark spots removed with knife
1 750-ml bottle Smirnoff vodka
3-1/2 cups water
2-1/2 cups sugar


Using a vegetable peeler, remove the peels from the lemons, reserving the lemons for another use. If any pith remains on the peels, cut it away with a small sharp knife and discard. It is imperative that no pith be placed in the vodka because it will cause the Limoncello to turn bitter! Place the lemon peels in a 2-quart pitcher or other 2-quart glass container. (I used a large mason jar which was just under 2 quarts. It was fine for fermenting the peels but when I added the syrup, I needed more room. So be sure you start out with a container large enough to spare yourself the aggravation of having to find a large enough container later.) Pour the vodka over the peels, cover and set in a dark cool place somewhere in the house (but not in the fridge) for 2 weeks. Give the container a little shake at the end of one week. (Giada and Mario Batali both say to ferment for 4 days.)

At the end of 2 weeks, combine the water and sugar in a large saucepan over medium heat until the sugar dissolves, about 5 minutes. The sugar water will look cloudy at first. You will know it is dissolved when it becomes clear again. But look carefully -- there may be some sugar crystals at the bottom. Stir and break them up and be sure your syrup is absolutely clear before you remove from stovetop. Cool syrup completely (probably several hours).


In the meantime, begin the filter process. Find a large pot or container, 2 quarts or larger. (I used a 3-quart pan with pour spouts. Place a strainer over the edge and pour the vodka mixture over the strainer into the pot so that the peels are caught in the strainer. Tiny pieces of lemon peel may go through, but don't worry you 'll get them in the next straining. Press down on the peels against the strainer so that you get as much vodka juice out of the peels as possible. Discard the peels. Remove the strainer and pour the vodka back into the first container. Place the strainer back over the pot and line it with a damp basket-style coffee filter. (Wet the coffee filter, then wring it out to make it damp.) Pour the vodka through the filtered strainer for a second time. Now the vodka should be clear. Check it. If not, repeat the process until you have a perfectly clear liquid. Now pour the cooled syrup into the vodka, stir and bottle. You can buy small bottles and use them to give Limoncello as hostess or Christmas gifts. I haven't done that yet. I reused the original Smirnoff bottle that I purchased to make the Limoncello as well as another larger bottle that Guy had just emptied. The photo above shows the Limoncello. It has a beautiful lemon yellow color and it's smooth and mellow. Definitely worth making. Like I said, I wish I drank! This would be great over ice cream. I will use it to bake with and for company and may give some as hostess gifts. The 750 liter (smaller) bottle in the photo above was placed in the freezer, (where it is supposed to be stored if you are going to drink it) and that's why it looks different.

Friday, August 24, 2007

LINDY'S NEW YORK CHEESECAKE, CONTINUED

Yesterday I published the recipe for Lindy's fantastic New York cheesecake, made with a food processor. Today I want to give the directions for making the cheesecake with a stand mixer. Although I have not made this cheesecake recipe with my KitchenAid stand mixer, I have made other cheesecakes with it. As I said yesterday, I prefer making cheesecakes with my Cuisinart 14-cup food processor. Here are the directions from the recipe I used. The ingredients were listed yesterday and do not change.

DIRECTIONS FOR MAKING LINDY'S CHEESECAKE WITH STAND MIXER:

Prepare dough by combining flour, sugar, and lemon zest. Make a well in center and add egg yolk and butter. Work together quickly with pastry blender or hands. Add 1 to 2 tablespoons lemon juice if necessary to bind dough. Wrap dough in plastic wrap and chill thoroughly, at least one hour.

Preheat oven to 400 degrees. Remove ring from springform pan. Roll one third of the dough 1/8 inch thick and place over bottom of pan. Trim the edge and bake in preheated oven till light golden brown, from 8 - 12 minutes. Cool. Place the springform sides over the baked base. Roll the remaining dough 1/8 inch thick and cut to fit the sides of the pan, pressing firmly to fit and seal the base. Trim the dough to come only 3/4 of the way up the sides. (See my note from yesterday.)

Preheat oven to 550 degrees. Cream cheese with sugar and flour until smooth. Add eggs and two additional yolks one at a time and blend. Add the flavorings and cream, mix well, and pour into prepared springform. Bake at 550 degrees for 10-12 minutes, then without opening oven door, reduce temp to 250 degrees and continue to bake for one hour. Cool the cake to room temp before glazing.

If you make the cheesecake, please give me feedback on how it turns out. My neighbor came this morning to get the cheesecake. She took 3/4 instead of a half and I charged her $25. Now that my freezer is empty of Lindy's, I can make it again. But first I have to make a fresh coconut cake, a lemon pound cake and a lemon trifle. (I have 10 lemons to use up from making limoncello which turned out fabulous! I will post that recipe later, but forgot to take a photo of the vodka with the lemon peels in it. Not to worry. I intend to make it again.)

Thursday, August 23, 2007

LINDY'S NEW YORK CHEESECAKE


This recipe has been around a long time. Lindy's is the daddy of all cheesecakes. The restaurant went out of business in the 70's without ever having given out the recipe for their world famous cheesecake. Gourmet Magazine published what they called the authentic recipe in a 1951 publication and it made the rounds like all good recipes. I have it in several old cookbooks and it's all over the internet. I don't know why I never made it. Always wanted to. The thought of making a real cookie crust rolled onto the springform pan intimidated me, as did working with the insane temperatures. Well call this my last fling or whatever, but I finally bit the bullet. Problems started early with the cookie crust. I guess I rolled it too thin and turned my back on the oven. I set the timer for 10 minutes, but the cookie must have gotten done at 5 minutes, because when I smelled it burning it was too late! I quickly made another batch of cookie dough and this time rolled it thicker. The dough is very short, so hard to roll and work with. Rather than overload it with flour and get a tough cookie, I worked with it in pieces. No problem it went on the pan fine. Next the temperatures. I used the cheap Wilton 9-inch springform pan that comes in a set of 3 from Wal-Mart for about $10.00. It's nonstick and dark. So I lowered the temperatures by 25 degrees to compensate for dark pan. I also put the pan on a bright aluminum cookie sheet because I didn't know if it would spill over. The 9" pan filled right up to the edge of the cookie dough. Be sure you go up a generous 3/4 when you put the cookie dough on the sides, or you'll be short. Since the batter went up so high, I expected it to rise like other cheesecakes, but I was pleasantly surprised. It stayed right there the whole time. I also put a pan of hot water beneath the cheesecake. The cheesecake batter itself I made in my Cuisinart food processor (14-cup) -- I also did the cookie dough in the Cuisinart and just wiped it out before doing the cheesecake batter. (I think the Cuisinart makes a better cheesecake batter, but I could be wrong. I would have to do the same recipe two different ways to be sure.) The timing and temperatures on this recipe are genuinely scary. I set the oven at 525 for 10 minutes, then without opening the oven door, set the oven down to 225 and set the timer on one hour. At the end of an hour, I opened the door and jiggled the pan. It was very wiggly and I knew it was not done. Since I had opened the door briefly, I turned the oven back on and it registered 281 degrees. I turned it back off and let the cheesecake sit for another half hour. I checked it again and it didn't wiggle, so I took it out and let it cool. Then I was worried I overbaked it. I cooled it completely on the counter, then put it in the fridge, covered with plastic wrap overnight. (It's best not to serve it the day you make it.) When I sliced into it the next day, it was absolutely perfect! The flavorings in this recipe are excellent and the texture is divine -- like eating solidified cream. The cookie crust is tender and not at all overpowering. Served with fresh fruit and a mint sprig it's an elegant dessert to grace any table. What I especially like about this recipe is that the batter does not crack, does not puff up and does not change. Please try it. It's not hard, you just have to take care. I will definitely make it again and again. Now for the final note: my neighbor called me yesterday to ask if she could buy a dessert from me for a party she is having Saturday. Voila! I had just put 3/4 of the cheesecake in the freezer and she only needs a half. She was delighted as was I because I am wanting to sell some of my desserts now. I have been giving them away like crazy and selling them will help to validate me, which is what this is all about. Anyway, you will get 12-16 servings from this cheesecake, depending on your appetite. I think 16 if you serve it with fruit. It's very rich. Here's the recipe with my changes:


LINDY'S CHEESECAKE


Ingredients: CRUST 1 cup all-purpose flour
1 egg yolk, room temp
1/4 cup sugar
1/2 cup butter, softened
1-1/2 tsp. lemon zest (I used a microplane grater)


FILLING 24 oz. Philadelphia cream cheese, softened
16 oz. Philadelphia Neufchatel cheese, softened (recipe calls for 40 oz.
of cream cheese)
1-3/4 cups sugar
1-1/2 tsp. ea. lemon zest and orange zest
5 eggs plus 2 egg yolks, room temp
1 tsp. pure vanilla extract (recipe calls for 1/2 tsp.)
1 Tbsp. lemon juice (recipe does not call for lemon juice)
1/4 cup heavy cream, room temp
3 Tbsp. flour

DIRECTIONS Place all dough ingredients in food processor and pulse several times till dough starts to leave sides of processor. If dough is too dry and doesn't come together, just add a teaspoon or more of lemon juice and pulse again. Wrap dough in plastic wrap and chill in fridge at lease one hour. Preheat oven to 400 degrees. Remove ring from 9" springform pan. Roll almost a half of the dough on lightly floured wax paper to about 1/8 thickness and place on bottom of pan. (Alternately, you can just press the dough onto the pan, conforming to fit.) Trim edges to fit and bake in preheated oven 8-12 minutes, checking at 8 minutes. Remove when dough is a light golden brown. Cool. Place the springform sides over the baked base. Roll the remaining dough about 1/8 inch thick and cut to fit sides of pan. It will be easier if you butter the sides first. This will give the dough something to cling to. Be sure you seal the base. Just lightly press the new dough to overlap slightly on the base. When you are all done, take a plastic knife and trim the dough so that it comes a generous 3/4 of the way up the sides of the pan.

Turn the oven to 550 degrees (or 525 if you are using dark or coated pan). Be sure all your ingredients are at room temperature. Don't rush this process. Place 1 block of cheese and 1/3 cup of sugar in the food processor and blend smooth for about 10 seconds. Continue with additional blocks of cheese and sugar till all are processed. Add the lemon and orange zests and the 2 egg yolks and process again till smooth. Add the remaining 5 eggs, one at a time, processing till smooth after each addition. Add heavy cream and vanilla, processing till smooth. Lastly, add flour and just pulse briefly till combined. Pour into prepared pan and bake in preheated oven for 12 minutes, then, without opening oven door, reduce temperature to 250 (or 225 for dark or coated pans) and continue to bake for one more hour. Check the cake for doneness by jiggling pan. If it wiggles, close the oven door and leave in oven for 15-30 minutes longer. When cake no longer wiggles, it is done. Remove to cake rack to cool. Cool completely before covering and placing in fridge overnight. May be frozen for up to 6 months.

Wednesday, August 22, 2007

This blog will be used to post recipes and useful comments for the novice and experienced cook. Tune in tomorrow for the first recipe and photo.