Tuesday, September 30, 2008

AVOCADO-CORN-GREEN TOMATO SALSA


Although our tomato crop was disappointing this year, I'm happy to say we did harvest a few gems. In order to beat the birds, we pulled off some green tomatoes. Some of them got wrapped in newspaper to ripen slowly, and some were earmarked for a salsa. Since the salsa was mostly going to be green, I added some tomatillas and avocado. I would have used a jalapeno, except that we grew our own hot peppers this year -- that's what the little red specks in the salsa are. Cilantro, corn and green olives rounded out the flavors of this salsa, and it is really good. But I haven't found a salsa yet that I didn't like.


Avocado-Corn-Green Tomato Salsa
Rating: 9 out of 10
2 green onions with tops, chopped
2 tomatillos, chopped
3 green tomatoes, chopped
1 jalapeno pepper, finely chopped
2-3 Tbsp. fresh cilantro, chopped
1 avocado, peeled, pitted, chopped
2 ears fresh corn, kernels and milk scraped off the cob (or 2 cups frozen or canned corn)
1-1/2 tsp. grated or minced fresh garlic
2 Tbsp. green olives, pitted, finely chopped
2 Tbsp. lime juice
1 Tbsp. extra-virgin olive oil

Combine all ingredients in a medium bowl; stir to mix well. Refrigerate to blend flavors, at least 1 hour. Serve with crackers, chips or veggies. Yield: About 3 cups

Sunday, September 28, 2008

THE CAKE DOCTOR'S DOUBLE CHOCOLATE KAHLUA CAKE, ADAPTED


One of the neighborhoods in our development had a pig pickin', and we were invited. I was asked to bring a dessert and decided to use the Cake Doctor's website to find a recipe for a box of Duncan Hines Devil's Food Cake Mix. I first tasted this cake at the party, when it was room temperature, and didn't care for it much, although everyone who tried it raved over it. There was a little left over and I put in the fridge overnight. I tasted it after lunch today, cold, and was surprised to note that the texture and flavor had improved greatly. I think this would be a great make-ahead recipe -- something to make the day before a party, rather than the day of, so the flavors can mellow out in the fridge. Serve it cold for best flavor. It doesn't need ice cream or any enhancements, and the frosting (my recipe, not the Cake Doctor's) is perfect with it -- not too sweet.

The Cake Doctor's Double Chocolate Kahlua Cake, Adapted
Rating: 8 out of 10
1 package (18.25 oz.) plain devil's food cake mix
2 Tbsp. unsweetened cocoa powder (Hershey's)
1/2 cup Kahlua (or generic coffee liqueur)
1/2 Tbsp. instant coffee powder (decaf is ok)
1 cup low-fat buttermilk
1/2 cup vegetable oil
3 large eggs

Place oven rack in center of oven and preheat oven to 350F. Grease and flour a 9x12 pan; set aside.

Place the cake mix, cocoa, Kahlua, buttermilk, oil and eggs in a large mixing bowl; blend with an electric mixer on low speed for 30 seconds. Stop the machine and scrape down the sides of the bowl with a rubber spatula. Increase the mixer speed to medium and beat 2 minutes more, scraping down the sides again if needed. The batter should look well combined. Pour the batter in the prepared pan, smoothing it out with the rubber spatula. Place the pan in the oven and bake till cake is barely done (when a toothpick inserted near center returns with just a few crumbs), about 30-35 minutes. Remove from oven and place pan on wire rack to cool for 5 minutes. Run a dinner knife around the edges of pan and invert onto a cooling rack; then invert again onto another rack so that the cake is right side up. Allow to cool completely, about 30 minutes - 1 hour. Return cake to baking pan and frost top with Mocha Cinnamon Frosting (see recipe below). Refrigerate overnight and serve cold for best flavor. Garnish top with chocolate shavings or broken cinnamon bark.

Mocha Cinnamon Frosting
4 oz. Neufchatel cheese, softened
1/2 tsp. cinnamon
1 Tbsp. coffee essence (see recipe below)
1 tsp. Mexican or regular vanilla
1/2 cup fat-free half and half
1 pkg. (3.4 oz.) chocolate instant pudding
1-1/2 cups frozen and thawed non-fat whipped topping

In medium bowl, beat cheese till soft and fluffy, about 2 minutes. Add cinnamon, coffee essence, vanilla and half and half and beat til well combined and smooth. Add pudding and beat on medium speed 2 minutes, till smooth and well combined. Fold in whipped topping carefully. Refrigerate till cake is thoroughly cooled.

Coffee Essence
1/4 cup Kahlua or generic coffee liqueur
3 Tbsp. instant coffee powder

Combine ingredients in a small jar. Refrigerate and use as needed. A teaspoon added to chocolate chip cookie batter is a wonderful enhancement.

Friday, September 26, 2008

JASPER WHITE'S SHRIMP CHOWDER WITH FENNEL, ADAPTED

This recipe comes courtesy of epicurious.com, and it's good. The flavors are rich and bold, and go great with the shrimp. The only complaint that Guy had was that the shrimp were too big. A shrimp chowder is best with small shrimp (26-30/lb.). I agree. I was trying to use up the ton of shrimp that he's been catching. When he empties our crab traps, he throws a net over the side of the dock and in come gazillions of fresh shrimp. They are delicious, and our freezer is full of them. So in the soup some of the latest catch went.

I didn't change much in this recipe. I added an ear of fresh corn. Instead of making my own shrimp stock (a nifty idea, but I had thrown out the shells already), I subbed with Clamato juice. It's part clam juice, part tomato juice. It worked very well. I left out the fennel seed because I didn't have any. Because I added corn, I reduced the potatoes. (Oh, and Guy said he doesn't like his potatoes sliced, he likes them cubed.) The only other change was that we didn't add cream or half and half. The soup didn't need it. It was fabulous by itself. What a rich broth -- really, really yummy. Give it a try. Not too hard and really, really good.

Jasper White's Shrimp Chowder with Fennel, Adapted Half Recipe
Rating: 10 out of 10
INGREDIENTS:
2 oz. (approx. 2 strips) bacon, diced
1 Tbsp. olive oil
1-1/2 tsp. chopped garlic
1/2 of a small fennel bulb, quartered, then sliced thinly (4 oz.)
4 oz. thinly sliced onion
1/4 tsp. red pepper flakes
2 cups Clamato juice
1/4 lb. thinly sliced potatoes
1/4 lb. cubed potatoes
1 ear of corn, kernels sliced, cob scraped (or 1 cup frozen corn)
1/2 cup tomatoes
1-1/2 cups low-sodium chicken broth
3/4 lb. (12 oz.) small shrimp, peeled
sea salt to taste
black pepper to taste

In a 3-quart heavy pot, cook the bacon over medium heat until crisp. Remove bacon; reserve for garnish. Remove all but 1 Tbsp. of the bacon fat. Add oil and garlic and cook 30 seconds over medium heat. Add fennel, onion and red pepper flakes and saute`, stirring occasionally with a wooden spoon for about 3-5 minutes, till vegetables begin to soften. Cover the pot, lower the heat and let the vegetables cook till they are very soft, about 10 more minutes.

Add the Clamato juice and the thinly sliced potatoes; turn up the heat and bring to a boil. (Juice should cover the vegetables; if not, add a little more.) Cover the pot and cook until potatoes are soft, about 10 minutes. You may need to reduce the heat during this time, but not to low. The mixture should maintain a slow boil.

Add the cubed potatoes and cook, covered for about 5 minutes, or till potatoes are almost cooked through. Taste to adjust seasonings, adding salt and pepper as needed.

Add corn, tomatoes and broth and simmer for about 5 more minutes. Stir in the shrimp and cook for about 1 minute, or till shrimp are barely cooked. Remove from heat and let the soup sit for about 10 minutes. Taste to adjust seasonings, adding more salt and pepper if needed. Serve soup with the reserved bacon as a garnish.

Yield: 4 large servings Deelish!

Thursday, September 25, 2008

BANANA PUMPKIN ZUCCHINI WHOLE-GRAIN MUFFINS

Katrina blogged about these muffins recently, and got me interested. She found the recipe on allrecipes.com and adapted it to muffins. I love reading Katrina's blog to see what creative idea she comes up with next and also to see the photos of her adorable boys.

It took me a while to make these muffins. First I had to buy a banana. I never did buy the wheat bran, so I subbed quick oats. The banana got ripe, then I had to freeze it because I wasn't ready. By then I had used up most of my zucchini and had to go buy more just so I could make these. I was going to make a half batch, but I was sure they would be good, so I made the full batch. I should have made the half batch. Not that these weren't good. It's just that I need to make them again. The flavor is outstanding, not too spicy at all, just very well rounded and flavorful. The problem is that the muffins are very dense, and the edges are tougher, or harder, than my normal muffins, and I need to make these again, adjusting the baking temperature, to see if that helps. The batter of these muffins is unlike any batter that I have ever worked with. There is no liquid, so the batter is very thick and stiff. I really think the batter needs some liquid: yogurt?My addition of butterscotch and white chocolate chips really takes these over the top. I will definitely make these again, but I will be baking them at 350F from the start --or maybe even 325F (instead of starting them at 400F and reducing the oven temp right away to 350F, like I usually do) and will possibly add some yogurt. But next time I will make a half batch.
Update: After reading the original recipe on allrecipes.com, I saw that it calls for 1 cup of maple syrup. I used 1/2 cup, so there is 1/2 cup of syruppy liquid missing. That probably accounts for some of the density of the muffin. I'm adding 1/2 cup liquid below.

UPDATE: See my revised recipe.

Banana Pumpkin Zucchini Whole-Grain Muffins
Rating: withheld for further testing
INGREDIENTS:
Crumb-Nut Topping: 3 Tbsp. whole wheat flour
3 Tbsp. brown sugar
3 Tbsp. oats
3 Tbsp. chopped toasted walnuts
2 Tbsp. butter, melted

Combine all ingredients in a small bowl with a spoon, fork or spatula. Set aside.

Muffins: 1/4 cup pumpkin
1 ripe banana, mashed
1/4 cup sugar (or sugar substitute)
2 large eggs
1/2 cup pure maple syrup + 1/2 cup vanilla nonfat yogurt (or 1 cup maple syrup)
1 Tbsp. pure vanilla extract
2 cups whole wheat flour (or whole wheat pastry flour, if preferred), lightly spooned & swept
1 cup quick oats (or unprocessed wheat bran, if preferred)
1 tsp. sea salt
1 tsp. baking soda
1/4 tsp. baking powder
1 Tbsp. ground cinnamon
1/2 tsp. nutmeg
1/4 tsp. powdered cloves
1/4 tsp. powdered ginger
1/16 tsp. allspice
1/2 cup toasted walnuts, chopped
1/2 cup butterscotch chips
1/2 cup white chocolate clips
2 cups grated zucchini

Preheat oven to 350F. In a large bowl, combine pumpkin, banana, sugar and eggs; whisk till well combined. Add syrup, yogurt and vanilla, whisking again till smooth and well combined.

In a medium bowl, combine dry ingredients, nuts and chips and whisk or stir till everything is mixed well. Add zucchini and stir with spatula till zucchini is well distributed throughout and coated with dry ingredients.

Add dry ingredients to wet and stir with spatula just until moistened. Batter will be very thick and stiff. Scoop into muffin tins that have been sprayed with non-stick cooking spray. Top each muffin with about 1 Tbsp. crumb-nut topping, pressing in slightly so it sticks. Bake about 20 minutes, or till muffins test done: when a toothpick inserted near center returns with just a few crumbs. Cool in pans 5 minutes, then turn out on wire rack to finish cooling. Yield: 12 standard size muffins.

Wednesday, September 24, 2008

SUNSET'S ROASTED RED PEPPER-TOMATO SOUP, ADAPTED

I love it when produce is on a fire sale. Our local Harris Teeter had large red peppers for 99 cents last week. Thanks to Debbie Meyer green bags, six red peppers will last me for several weeks. I roasted 2 of them yesterday so I could make this soup and have some left over for sandwiches. This recipe comes courtesy of Sunset magazine, and was posted on myrecipes.com with stellar reviews. I followed the recipe pretty closely, just reducing the tomatoes a bit, increasing the peppers and topping off my soup with a drizzle of fat-free half and half; Guy said he wanted his soup straight up. We both enjoyed this soup. It's not my favorite roasted red pepper soup recipe, but it was very enjoyable and I might make it again sometime; that is, if I run out of other recipes to try.


Sunset's Roasted Red Pepper-Tomato Soup, Adapted one-third recipe
Rating: 8 out of 10
INGREDIENTS: 1-1/2 roasted red pepper (homemade or jarred)
1 Tbsp. extra-virgin olive oil
heaping 1/2 cup chopped onion
1-1/2 tsp. coarsely chopped garlic
1 cup tomatoes with their juice (canned or fresh)
1 tsp. smoked paprika
1 cup low-sodium chicken broth
3/4 tsp. lemon juice
sea salt and pepper to taste
Toppings: creme fraiche, sour cream, yogurt or just a drizzle of fat-free half and half;
chopped parsley

To roast the red peppers: preheat broiler or charcoal grill. Cut the peppers in half. Place in a baking pan and broil, skin side up, 4-5" from heat (or place directly on grill, skin side down) until skins are black and blistered, about 5-8 minutes. Place peppers in a paper bag or in a bowl with plastic wrap over it. Let cool 10-15 minutes. Peel the peppers and chop coarsely, reserving juices.

In a medium pan over medium heat, add the oil and onion; stir often until onion is soft, about 5 minutes. Add garlic and stir until translucent, 1-2 minutes. Add peppers, tomatoes, juices, and paprika. Bring to a low simmer and cook, stirring occasionally, about 3 minutes.

In a blender or food processor, puree the soup until smooth. Return to pan and stir in broth and lemon juice. Stir over medium heat until hot. Taste to adjust seasonings, adding salt and pepper as needed. Ladle into cups or bowls and garnish as desired. (Can be made up to 3 days ahead. Store airtight in fridge. Reheat before serving.) Yield: 2 large servings or 4 smaller servings

Tuesday, September 23, 2008

PEACH FRANGIPANE TART


Since our last visit to New Jersey, where I bought a bag of Bob's Red Mill Almond Meal flour for $9.99 (a full $5.00 cheaper than the price in New Bern), I've been wanting to try my hand at a frangipane tart. With a handful of peaches left in my fridge, I thought it was time. I was a little nervous. A frangipane tart is a bit of work, and it never really sounded that good to me. Almond paste and fruit? What a strange combination, or so I thought. I should have realized that, as a French dessert, it would have to be good. Bob was nice enough to print a frangipane recipe on the back of his almond meal bag. But his recipe uses puff pastry, and I wanted to make my own. So I decided to use the standard gallette dough recipe for the pastry. I had my own idea on how to put the peaches together, so instead of using someone else's recipe, I made my own.

I must now give my eternal thanks to the Marquis Muzio Frangipani for creating a perfume, made of bitter almonds, to scent the gloves of Louis XII. It's supposedly what inspired local patisseries to create the cream (made with milk, sugar, flour, eggs, butter and ground almonds) that we know as frangipane (or at least that's the story that's circulating on the internet). Frangipane beautifully complements fruit, especially stone fruits -- apples, peaches, plums, cherries and pears; and I am a born-again convert to frangipane. This dessert is rich and delicious, especially served with ice cream. There was a little bit left over from our dinner and I ate it the next day, cold, with just as much gusto as when it was freshly baked. I highly recommend this recipe.

One word of caution: always use the best quality fresh fruit available. If the fruit doesn't taste good when it's fresh, it won't taste good when it's baked.

Peach Frangipane Tart
Rating: 10 out of 10
Click for PRINTABLE PAGE

Gallette Dough: 
1-1/4 cups unbleached all-purpose flour
1 Tbsp. sugar
1/4 tsp. sea salt
8 Tbsp. unsalted butter, very cold or frozen, cut into small pieces
1/4 cup + 1 Tbsp. ice water

In a food processor, combine flour, sugar, and salt, pulsing briefly till mixed. Add butter and pulse at intervals until mixture is like coarse meal, with the butter in tiny pieces no bigger than small peas. Add 1/4 cup ice water and pulse till mixture forms into a ball. If needed, add the extra Tbsp. water, but be sure you really need it. If you add too much the mixture will be too sticky. Shape into a ball, wrap in plastic wrap and chill for at least 30 minutes, or overnight.  Roll out about 3/4 of the dough to an 11" circle on a floured board.  (Use remaining dough for an individual tart.)  Fit into a removable-bottom tart pan, pressing dough up the sides of the pan. Let the dough hang over the edges just slightly, and crimp the edges over the outside of the pan so that the dough will not shrink when baked. Refrigerate.

Frangipane: (enough for 2 tarts -- you can freeze one half for later)
1/4 cup butter, very soft
1/2 cup confectioner's (10X) sugar
1/8 tsp. almond extract
3/4 cup almond meal flour
1 Tbsp. unbleached all-purpose flour
1 large egg

Beat together the butter and sugar till fluffy and light in a medium bowl. Add extract, almond meal, and AP flour and beat till smooth. Beat in the egg till everything is mixed well. Set aside.

Peach Filling:
1 Tbsp. butter
3 cups fresh or frozen peaches
3 Tbsp. sugar
1 tsp. lemon juice
1 Tbsp. almond liqueur
1/4 cup apricot spreadable fruit or preserves (or peach jam)

Melt butter in large heavy skillet. Add peaches and sugar and cook over medium heat till peaches are just barely soft, about 5 minutes. Remove peaches to a 9" pie plate in a single row to cool. Add almond liqueur, lemon juice and fruit preserves to skillet with remaining juices and cook till thickened, about 5 minutes. Remove from heat and cool.

Assembly:  Preheat oven to 400F. Spread 1/2 of the frangipane over the bottom of the refrigerated pastry crust. Lay the peaches in a concentric circle over the top of the frangipane. Spoon the cooled syrup over the peaches evenly. Bake 20-25 minutes or till filling is bubbly and crust is browned. (If crust browns too quickly on edges, cover with foil.) Trim edges of pastry that were crimped over the outside of the pan. Serve with creme fraiche, ice cream or whipped cream. Yield: 8 servings

Sunday, September 21, 2008

CRANBERRY MUFFINS WITH WALNUT CRUMB TOPPING


I'm so proud of myself. Raspberries were on sale again this week, and I resisted the urge to buy more. My freezer is loaded with raspberries, blackberries, blueberries, and yes, even cranberries left from last year. Today's recipe used the last of the cranberries. The last 2 cups. Until they come in season again, which will be very soon. This is an excellent muffin recipe from Food & Wine, March 2001 issue. The walnut crumb topping is so very good. I made my usual changes: subbed some whole wheat flour, made them lower fat by subbing applesauce for some of the butter, and subbed some Stevia for some of the sugar. But I also added some flavorings, because the recipe was a little bland. Orange and lemon zests really accent the fruit and vanilla brings it all together. 1 cup of grated fresh apple added some moisture and flavor; and the end result is a moist, flavorful muffin that will please the most discriminating eater. The list of ingredients is long, but worth the effort, because these muffins are very special. I guarantee you will not only like them, but you will make them again and again. Blueberries would work well here also.


Cranberry Muffins with Walnut Crumb Topping
Rating: 10 out of 10
INGREDIENTS:
Topping:
1/4 cup walnut pieces, toasted
1/2 cup whole-wheat flour
1/4 cup sugar
1/2 tsp. molasses
1/4 tsp. baking powder
pinch of sea salt
2-1/2 Tbsp. melted unsalted butter
Muffin:
1 cup all-purpose unbleached flour
1 cup whole-wheat flour
1/2 cup sugar + 2 Tbsp., divided use
2 tsp. baking powder
1/2 tsp. baking soda
pinch of sea salt
2 tsp. orange zest
1 tsp. lemon zest
1 cup nonfat vanilla yogurt
1 large egg
2 Tbsp. melted unsalted butter
1 tsp. pure vanilla extract
1/2 cup applesauce
2 cups cranberries
1 cup grated tart apple

Preheat oven to 425F. Lightly grease cups and top of a 12-cup muffin pan; set aside.

Make the crumb topping: Combine all topping ingredients in a small bowl; mix with fork or fingers; pinch the topping mixture into clumps; set aside.

Make the muffins: In a medium bowl, whisk together the flours, 1/2 cup sugar, baking powder, baking soda, salt, orange and lemon zests, mixing till well combined. In a large bowl, whisk yogurt, egg, butter, vanilla and applesauce, mixing till well combined and smooth. Rinse and drain the cranberries; pat dry with paper towels; stir the remaining 2 Tbsp. sugar into the cranberries; add the apple. Stir the cranberries and apple into the dry ingredients, mixing well to distribute ingredients. Add the wet ingredients all at once and stir only until barely combined, using a spatula. Spoon about 1/4 cup batter into each of the 12 cups and cover with the crumb topping. Gently press the topping onto the muffins so it adheres. Place muffins in oven and immediately reduce heat to 350F. Bake for 18-22 minutes, or until the muffins test done when a toothpick inserted in center returns with just a few crumbs. Let the muffins cool in the pan for 5 minutes, then transfer to a rack to finish cooling. Yield: 12 muffins

Friday, September 19, 2008

CHOCOLATE ZUCCHINI MUFFINS


Wow, are these the best muffins! The original recipe is on the
Penzeys Spices website,
but I halved it and made changes. These are moist, chocolatey, flavorful and even have fiber and some food value. You know I won't say they're healthful. No way. Not with sugar. But I will say that one muffin will definitely fix your chocolate craving, and you won't blow all your calories.
A word of caution: If you use large zucchini, cut out the seeds before grating. And after you grate the zucchini on your box grater, be sure to cut it up even smaller. You want the zucchini to be finely grated or chopped.
Chocolate Zucchini Muffins
Adapted Half Versiion from Penzey's Spices
Rating: 10 out of 10
INGREDIENTS:
Muffins: 1/2 cup applesauce (I used unsweetened)
2 Tbsp. Canola or vegetable oil
3/4 cup brown sugar (You can use part or all sugar substitute, but not Splenda, please!)
1 large egg (or egg substitute, if desired)
1 tsp. pure vanilla extract
1/2 tsp. chocolate flavor (optional)
1/3 cup nonfat vanilla yogurt (I used Stonyfield Farms)
1-1/4 cup whole-wheat flour (I used King Arthur)
2 Tbsp. cocoa (I used Hershey's Natural)
1/2 tsp. instant coffee powder
1/4 tsp. sea salt
1/2 tsp. baking soda
1/4 tsp. cinnamon
1/2 cup semi-sweet or bittersweet chocolate chips
1 cup finely grated zucchini, pressed between paper towels to remove excess water
Topping: 1/3 cup chocolate chips
1 tsp. cocoa powder
1/2 tsp. cinnamon
2 Tbsp. sugar
Preheat oven to 400F. Spray a 12-cup muffin tin with non-stick cooking spray. Place water in center 2 muffin cups, as there will only be enough batter for 10 muffins. Set aside.
In a large mixing bowl, whisk together first 7 ingredients till well combined. In a smaller bowl, combine flour, cocoa, coffee powder, salt, baking soda and cinnamon, stirring well to distribute ingredients evenly. Stir in the chocolate chips and zucchini, mixing to coat well with dry ingredients. Add all at once to the wet ingredients with a spatula and just mix till barely combined. Fill muffin cups with about 1/4 cup batter each.
In a small dish or bowl, combine topping ingredients. Sprinkle each muffin top with topping. Place in oven and immediately reduce heat to 325F. Bake about 20 minutes, or till muffins test done, when a toothpick inserted near center returns almost clean. Do not overbake! (If inserted in chocolate chip, a retest will be necessary.) Yield: 10 muffins.

Thursday, September 18, 2008

RASPBERRY SWIRL CREAM CHEESECAKES


One of my sons gave me a set of 4 of these adorable 4-1/2" springform pans for my birthday this year. But I haven't been able to find any recipes tailored to these pans. So I made my own. With a freezer full of berries and whole-wheat flour and a fridge full of Neufchatel cheese, I decided to come up with a recipe for a raspberry swirl cheesecake. I've made strawberry swirl cheesecake where the puree is swirled in the cheeseake batter. This time, I decided to mix the puree with some of the cheesecake batter before swirling. And, because I was using these cute little pans, I thought the cakes would lend themselves to a Valentine's dinner, hence the heart design on one (just trying it out). Swirling with plain puree gives a more pronounced color contrast. When you mix the puree with the cheesecake batter, you get more of a raspberry pink, as opposed to a red. Tastewise, it's good stuff -- tastes like raspberry ice cream to me.....yummo. This recipe turned out great. The whole-wheat shortbread crust, with a hint of almond, paired well with the hint of almond in the cheesecake and the mildly tart flavor of the raspberries. The cheesecake, itself, is a New York
style -- very creamy and dense and rich. I'm so glad I got to use these adorable pans. Hopefully someone else out there has these pans and will appreciate that I did the homework. What to do if you don't have 4-1/2" springform pans? Try making this in an 8" springform pan, or even in foil cupcake liners.
Raspberry Cream Cheesecakes
Rating 9 out of 10
Raspberry Puree:
1/2 cup raspberries, frozen or fresh
1 Tbsp. raspberry preserves
1 Tbsp. your favorite liqueur (I used Limoncello, but almond liqueur would work)
1/2 tsp. cornstarch
additional sugar to taste (I added 1 tsp.)
Combine raspberries, preserves and liqueur in small saucepan and heat to boiling over medium heat. Cook about 3 minutes, or till raspberries are soft and can be mashed down with a spoon or fork. Press through sieve to remove seeds. Return puree to saucepan and taste for sweetness, adding sugar if needed. Stir in cornstarch; heat to boiling and cook till slightly thickened, about 3 minutes. Remove from heat; cover; set aside.
Almond Shortbread Crust:
6 Tbsp. unsalted butter, very soft
1/2 cup confectioner's (10X) sugar
1/4 tsp. sea salt
3/4 cup whole-wheat flour
1/8 tsp. almond extract
Preheat oven to 325F. Beat butter in medium bowl until creamy. Add 10X sugar & salt; beat till light and fluffy. Blend in flour and extract. With fingers, press onto bottoms & slightly up sides of pans, dividing dough equally among 3 4-1/2" springform pans that have been lightly sprayed with non-stick cooking spray. Bake 14-17 minutes, or till set. Cool on wire rack.
Raspberry Cream Cheesecake Filling:
2 oz. white chocolate (I used Sam's Choice white chocolate chips -- high-quality chips, low price)
12 oz. Neufchatel cheese, room temp
1/3 cup sugar
1 large egg + 1 large yolk, room temp
3 Tbsp. heavy cream, room temp
1 Tbsp. nonfat vanilla yogurt, room temp (I used Stonyfield Farms)
1/2 tsp. pure vanilla extract
1/8 tsp. almond extract
2 tsp. cornstarch
Line a cookie sheet with aluminum foil. Set the cheesecake pans on it. Set aside.
In small custard cup, measure the white chocolate. Set the cup in a small pan of hot water over medium heat till chocolate melts. Stir with small spatula. (You can use microwave, but white chocolate burns easily, then clumps together, so beware. This is the safest way to melt it.)
Set aside to cool slightly while preparing the batter.
In a medium bowl, beat the cheese and sugar together till creamy. (I used an electric hand mixer for this.) Add the egg & yolk, one at a time, beating only till combined after each. Stir in remaining ingredients on low speed of mixer or by hand with spatula. Measure 1/2 cup of the batter and stir it into the raspberry puree, which is now cooled. Stir the slightly cooled white chocolate into the white batter. Spoon about 1/2 cup of the white batter into each pan; top with about 2 Tbsp. raspberry batter; then equally distribute the remaining white batter over tops. Dollop remaining raspberry batter over tops; drag a toothpick through batter to create a swirl effect. (Alternately, you can create a design with the final raspberry batter, such as a heart.)
Bake about 35 minutes, or till cheesecake is almost set. Run a sharp knife around edges of cheesecake pans after removing them from the oven. As the cheesecakes cool and start to pull away from the edges, this will keep the cheesecakes from cracking. Cool thoroughly before refrigerating. These are best left to the next day before eating, if you can control yourself. These are really, really dee-lish. Yield: 3 cheesecakes, 4-1/2" each


Wednesday, September 17, 2008

SHRIMP FRA DIAVOLO, ADAPTED


My life is not my own. Two days a week belong to my Physiatrist and Physical Therapist, and one day belongs to my Chiropractic Neurologist. And now I'm adding the dentist. On the plus side, I am getting to read a lot of magazines as I wait in medical offices. This recipe is from the January 2008 issue of Good Housekeeping Magazine, courtesy of my Physiatrist. Good Housekeeping has their own website, and this recipe is posted there. Guy and I both enjoyed this. (My changes: I added 1/2 of a green and 1/2 of a red pepper. And I didn't have the oil-packed sun-dried tomatoes, so I used what I had: regular sun-dried. I rehydrated them in hot water, and added 2 tsp. of EVOO.) A word of caution: don't skimp on the basil; it's important to the flavor of this dish. I made the full recipe, and we got 2 meals out of it. Since I have to cook two pots of pasta, one white for him, and one whole-wheat for me, that was a nice bonus to not have to cook when we had the leftovers. And nothing else is needed with this dish, since it's a completely balanced meal in itself: protein, whole grains and veggies.
Shrimp Fra Diavolo, Adapted
Rating: 8 out of 10
INGREDIENTS: 1/4 cup sun-dried tomatoes in oil, chopped (or rehydrated tomatoes with some oil added)
2 cloves garlic, chopped or grated
1/4 to 1/2 tsp. crushed red pepper
1 red or green bell pepper, sliced in strips (or half of each)
1/4 tsp. sea salt
1 pkg. (13.25 oz.) whole-grain spaghetti
1 can (28 oz.) diced tomatoes in puree (I used Red Pack plum tomatoes in puree and chopped them)
1 lb. fresh or frozen and thawed shelled and deveined jumbo raw shrimp
1-1/2 cups loosely packed fresh basil leaves, chopped
Heat large saucepot of salted water to boiling on high.
Meanwhile, heat a 12-inch skillet on medium until hot. Add sun-dried tomatoes, garlic and crushed red pepper, and cook until garlic is fragrant, about 1 minute. Add pepper strips and salt; cook and stir another minute or two. Add tomatoes with puree; heat to boiling on medium-high and cook 5 minutes to blend flavors, stirring and breaking up tomatoes with side of spoon. Cover and simmer. When water boils, add spaghetti and cook as label directs. About 3-4 minutes before spaghetti is done, turn up heat under skillet and add shrimp. Drain pasta and return to saucepot. Add shrimp mixture and basil to pasta in saucepot; toss to coat. Yield: 4 servings

Tuesday, September 16, 2008

BLACK BEAN 'N OLIVE SALSA

Why did it take me so long to get on to salsas? I am so in love with them. This one is a Kraft recipe. The changes I made were really insignificant, and didn't affect the flavor or outcome. This salsa is not only great with taco chips, but also as a condiment for grilled chops or chicken. And, as an added bonus, this is the fastest salsa I've made yet, since you start with a jar of purchased salsa and, basically, just doctor it.

Black Bean 'n Olive Salsa
Rating: 10 out of 10


INGREDIENTS:
1 cup canned black beans, drained and rinsed
1 jar (16 oz.) Thick 'n Chunky Salsa
(I used the Harris Teeter store brand thick 'n chunky salsa.)
3/4 cup coarsely chopped pitted black olives (I put some green ones in, too.)
1/2 cup whole kernel corn (I used 1 ear of fresh corn, scraped from the cob, uncooked.)
1 Tbsp. chopped fresh cilantro
2 cloves garlic, minced (I grated it
because it's much faster & easier.)
2 tsp. fresh lime juice

Mash some of the beans in a medium bowl with a fork. Add all remaining ingredients, including remainder of beans, and mix well. Refrigerate, covered, at least 1 hour for flavors to blend. Serve with crackers, veggies, taco chips, or as a condiment to grilled meats and poultry.
Dee-lish! Makes about 3-1/2 cups of salsa.

Monday, September 15, 2008

PEANUT BUTTER CUP-BLISS MUFFINS


Yesterday I looked in my garage fridge and realized that the 8 containers of yogurt were all past their expiration dates. I've used yogurt up to a month past expiration, but I thought I should move this process along. So I decided to bake muffins. Not wanting to repeat muffins I've already made, I concocted this muffin. The title should probably be something like "peanut butter cup-bliss muffins with peanut crumb topping," but I thought that was too long. Anyway, the yogurt did its job. These muffins are
nice and moist and pretty flavorful. And, P. S., I would have used milk-chocolate chips; but when I checked my pantry, I found I didn't have any. And, true to my word, I wasn't going to go out and buy any when I had the Bliss on hand. Feel free to sub milk chocolate chips for the Bliss. These muffins are a nice change, and I enjoyed them.

Peanut Butter Cup-Bliss Muffins
Rating: 8 out of 10
INGREDIENTS:
Crumb Topping:
1/4 cup salted peanuts, chopped fine
1/2 cup whole-wheat flour
2 Tbsp. sugar
1/4 tsp. baking powder
pinch of sea salt
1/4 cup chunky peanut butter
1 Tbsp. melted butter

Combine all ingredients in a small bowl and work together with a fork or with your fingers.

Muffins:
1 cup whole-wheat flour
1 cup self-rising flour
1/2 cup sugar
1/2 tsp. baking powder
1/4 tsp. baking soda
3/4 cup milk chocolate chips, chunks or Hershey Bliss Milk Chocolate cut into small pieces
3/4 cup - 1 cup Reese's PB Miniatures, chopped, then frozen
1 cup vanilla nonfat or low-fat yogurt
1 large egg
2 Tbsp. melted butter
1/2 cup applesauce
1 tsp. vanilla
1 tsp. chocolate flavor (optional)

Preheat oven to 425F. Prepare a 12-cup muffin tin by spraying with non-stick cooking spray; set aside. In a large bowl, combine the dry ingredients with a whisk. Add the milk chocolate and the frozen PB cups and toss to distribute. In a medium bowl, whisk together the wet ingredients till smooth and well combined. Add all at once to the dry ingredients, using a spatula. Only mix to combine, leaving lumps. It's important not to overmix. Spoon about 1/4 cup batter into each muffin cup and top with about 1-1/2 Tbsp. topping, pressing in slightly. Place muffins in oven and immediately reduce heat to 350F. Bake about 16-19 minutes, or till toothpick inserted near center returns with just a few crumbs. Cool in pans about 5 minutes, then transfer muffins to wire rack to finish cooling. Yield: 12 muffins.

Saturday, September 13, 2008

HOW TO GRILL A CORNISH GAME HEN

Cook's Illustrated has a PBS show called America's Test Kitchen. A recent episode was on the proper grilling of a cornish game hen so that the skin is crispy. According to ATK, you can't get a crispy skin if you leave the hen intact, so you must partially bone it and lay it flat first. I tried it, and I must say, it was the best cornish game hen I've had because the skin was, well, crispy, like they said it would be. Their recipe for the glaze and spice rub were perfect IMHO, but Guy said he prefers just salt and pepper (ugh). They served the hen with a beautiful rice salad with oranges, olives and almonds, but I had to beg off that one. Instead, I made a simple pilaf of onions, garlic, mushrooms and carrots with the rice,and it was delicious. This is definitely my new way of grilling game hens.
Grilled Cornish Game Hen
(America's Test Kitchen)
Rating: 10 out of 10
To get started, turn the bird over and cut out the backbone (just cut up one side and down the other with poultry shears.) Then, on the underside, snip the breast bone without going through to the skin (if you are keeping the bird in one piece, as they did. To make things simple, I just cut the bird in half since Guy and I would each have a half.) Next, brine the bird in 1/4 cup salt to 1 quart water and refrigerate for 1 hour. Rinse well and pat dry on paper towels. Next, rub the bird with a spice rub on both sides.

Spice Rub: 1-1/2 tsp. brown sugar
3/4 tsp. paprika
1/2 tsp. chili powder
1/2 tsp. garlic powder
pinch coriander
pinch black pepper
pinch cayenne or hot pepper

Grill the bird over indirect heat (375-400F). ATK recommends skewering the bird to keep it from breaking apart while grilling. That looked too complicated to me, so we just put each half in a grilling basket. The only problem we had was that we only

have 3 burners on our grill. We usually turn the middle burner off and cook on that. The two baskets, because of the handles, would not fit on the middle burner. So we had to cook over direct heat. We just monitored to be sure that the temp didn't go over 375F and it worked fine. There was no flareup, hence no burning. The bird will take about 30 minutes. (If one side of your grill burns hotter, be sure to rotate the bird for even grilling.) For the last 10 minutes, apply the glaze, first on one side, then flip after 5 minutes and glaze the other side. That's it. Delicious.

Glaze: 1/2 cup ketchup
2 Tbsp. brown sugar
1 Tbsp. soy sauce
1 Tbsp. yellow mustard
1/4 cup water
1 whole minced garlic clove
Combine all ingredients in a small saucepan and heat to boiling. Lower heat and simmer for 5-10 minutes to develop flavors. Remove from heat until ready to glaze the bird.

This recipe will yield 1 game hen (2 servings). Multiply by 2 for 4 servings; by 3 for 6 servings; etc.


Thursday, September 11, 2008

YUMMY BEEF FAJITAS

I've only eaten Fajitas once, several years ago while on a business trip to Tuscon, Arizona. Our entire group went to a Mexican restaurant, and I ordered Fajitas. They were quite unremarkable. I'm not sure if I just didn't appreciate Mexican food at the time, or if the restaurant wasn't that good. But there was no outstanding flavor to the food, so I suspect it was the latter. Then I watched Tyler Florence make Fajitas on the Food Network, and they looked and sounded so yummy. I decided to take a chance because the ingredients appealed to me, especially the marinade. I wasn't disappointed. I'd like to say these were the best
Fajitas I've ever had; but that would be incorrect grammar since I've only had Fajitas twice. So I guess these were the better Fajitas. They're not hard to make. When Guy asked me what was for dinner, I told him we were having "Mexican steak sandwiches." He was ok with it and he even opted to eat a whole-grain tortilla. Of course, I didn't mention it was whole grain and he didn't seem to detect that it was. I'll be making these again because they're really, really good.

Tyler Florence's Fajitas
Rating: 10 out of 10
INGREDIENTS:
Marinade (Mojo): 1 orange, juiced
2 limes, juiced
4 Tbsp. olive oil
2 garlic cloves, roughly chopped
3 chipotle chiles in adobo sauce
3 Tbsp. roughly chopped fresh cilantro leaves
1 tsp. ground cumin
1 tsp. salt

2-1/4 lbs. skirt or flank steak, trimmed of fat, cut into thirds, or 8" pieces
salt and pepper
2 red bell peppers, thinly sliced
1 large onion, thinly sliced
lime juice, olive oil, optional
12 flour tortillas, warm
Guacamole, recipe follows
Good-quality store-bought salsa

In a small 2-cup measuring cup, or something similar in size and shape, combine all the marinade ingredients. Using an immersion blender, puree the marinade until smooth. Transfer to a resealable plastic bag and add the steak; seal and shake to coat. Refrigerate the beef for 2-4 hours to tenderize and flavor the beef.

Preheat a grill pan, preferably ridged, on high heat.

Drain the marinade from the beef; discard. Lightly oil the grill or grill pan. Season liberally with salt and pepper. Grill the steak over medium-high heat and cook for 4 minutes on each side and then transfer to a cutting board and let rest. Depending on the size of your grill pan you may need to cook in batches.

Once the beef is off the grill pan and resting, add the bell peppers and onions tossed with lime juice and olive oil, if using. Grill the mixture for 7-8 minutes until the vegetables are just barely limp.

While the peppers and onions are cooking, heat up the tortillas. Turn any free burners on a medium low flame. Place a tortilla on each flame and let it char about 30 seconds to 1 minute; flip the tortilla and repeat on the second side. Once heated and charred, remove the tortilla to a clean tea towel and wrap to keep warm. Repeat until you have warmed all of your tortillas.

You can also heat your tortillas in a microwave: lightly dampen a tea towel with some water, wrap the tortillas in the damp towel and heat in the microwave for about 1 minute. Check to see if they are warm; if not, repeat the heating at 1 minute intervals until they are warm and pliable.
Thinly slice the steak against the grain on a diagonal. (You will be slicing on the long side of the steak, since the grain on a skirt steak runs on the short side. That is why you cut the steak into 8" pieces.)

To serve: Spread some guacamole on a tortilla, top with a few slices of steak, peppers and onions and salsa. Roll up the tortilla to enclose the filling. You may also add sour cream and shredded cheese, if desired.
Guacamole
5 ripe Hass avocados
3-4 limes, juiced
1/2 small onion, chopped
1 small garlic clove, minced
1 serrano chile, chopped
1 big handful fresh cilantro leaves, roughly chopped
Kosher salt and freshly ground black pepper
olive oil
Halve and pit the avocados. With a tablespoon, scoop out the flesh into a mixing bowl. Mash the avocados with a fork, leaving them still a bit chunky. Add all of the rest of the ingredients, and fold everything together. Lay a piece of plastic wrap directly on the surface of the guacamole so it doesn't brown and refrigerate for at least 1 hour before serving. (You can also use purchased guacamole, if desired.)

Tuesday, September 9, 2008

YOU'RE NEVER TOO OLD TO LEARN!

Take a look at our windows before. Just plain old double-hung windows. No great shakes.
And this is our front door, with beautiful leaded-glass windows over and around.
Guy always had a vision of leaded-glass windows for our fireplace wall. He wanted the windows inside to mimic the windows over and around the front door. He learned how to do leaded glass, and these windows are the result of several weeks of work.
He even made a leaded-glass insert for the transom window over our French Doors, so the entire living room has leaded-glass windows.

What a Guy!

Monday, September 8, 2008

HAVARTI GRITS

In 2005, my son Jim flew out from San Diego to spend a few days with us. We all ate at a restaurant in Swansboro, NC. I forget the name of the restaurant, but I will always remember the meal. I had fresh tuna on Havarti grits. It was so very good. I've never made grits in my life, and decided it was time I should because I have never stopped thinking about those grits. When I saw Havarti-Dill cheese in the Wal-Mart deli, my brain went into overdrive. I bought a bag of Bob's Red Mill Grits; and ,two nights ago, I made Havarti Grits. I was worried that the dill would overpower, but, honestly, I didn't even know there was any dill in there at all.

Here's the thing about grits: you must keep stirring. If you stop, you will ruin your grits. I didn't use a recipe. I just went off the package instructions, and subbed fat-free half and half for the water. At the end, I plopped in a Tbsp. of butter and added the cheese which I chopped up. Next time, though, I think I will do half water, half milk, just to compare, although I liked these the way I made them. Here's a recipe, but I did have to add more water as they cooked.

Havarti Grits
1 cup fat-free half and half
pinch of sea salt
1/3 cup grits
1 Tbsp. butter
2 Tbsp. (or more) Havarti cheese, chopped
water, as needed

Bring the H&H, salt, and grits to a boil over medium heat in a 1 quart saucepan. Cook on a low boil while stirring, till grits are smooth, about 5-6 minutes, adding water if necessary to keep the right consistency. When grits are cooked and smooth, stir in the butter and cheese; remove from heat; cover to keep warm. Yield: 2 servings

Sunday, September 7, 2008

PAN-SEARED SCALLOPS WITH RASPBERRY VINAIGRETTE


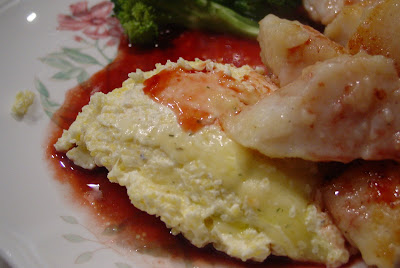
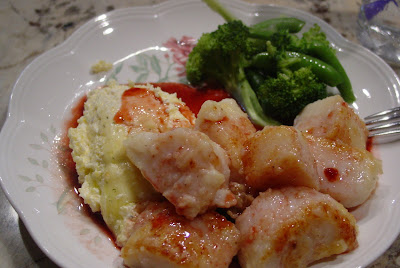
Tonight's meal was an exercise in multi-tasking. Guy doesn't like scallops. He also doesn't like grits. Nor does he like broccoli. I made him garlic and onion steamed crabs and he was happy eating that with no veggies. But at the same time, I cooked my dinner which was broccoli and peapods, Havarti Grits, Pan-Seared Scallops and Raspberry Vinaigrette. And, amazingly, we both sat down to eat at the same time. I am still unsure how that happened. Not surprisingly, I did goof on my meal a little bit. I should have added some cornstarch to the vinaigrette;
it was a bit runny. I've corrected that in the recipe below. And, in my rush to get things done, I forgot to blot the scallops on a paper towel to dry them well before I seared them; hence, they didn't brown well. But, in spite of my little slip-ups, the meal was delicious. The raspberry vinaigrette is so nice on the scallops -- a perfect complement. I can't even describe the grits, they were just so wonderful. And I love broccoli and peapods with garlic and olive oil. So I was in my own heaven as I ate.

Pan-Seared Scallops with Raspberry Vinaigrette
Vinaigrette: 2 Tbsp. raspberry preserves
1 Tbsp. raspberry balsamic vinegar (or plain balsamic vinegar)
1/2 cup fresh or frozen raspberries
1/2 tsp. cornstarch
big pinch of black pepper
Place all vinaigrette ingredients in a small saucepan and heat to boiling. Cook about 3 minutes, or till sauce starts to thicken. Remove from heat; cool slightly; press through a sieve to strain out seeds. Keep warm.

Scallops: 1 Tbsp. extra-virgin olive oil
1 lb. fresh sea scallops
1/4 tsp. sea salt
1/8 tsp. black pepper
Heat the oil to a sizzle in a 12-inch heavy fry pan over medium heat. Add the scallops; sprinkle with salt and pepper. Cook about 2-3 minutes; turn; cook 2-3 more minutes, or till scallops are almost done inside. (It's always a good idea to slightly undercook fish. Scallops should be nicely browned when you turn them.)

Serve scallops with the raspberry vinaigrette drizzled over them on a bed of cheesy grits.
Yield: 2-3 servings


Saturday, September 6, 2008

DOUBLE PEANUT BUTTER CHEESECAKE SWIRLED BROWNIES, ADAPTED

The original recipe for these brownies looked incredibly decadent, and I am sure they are delicious. But, to save calories and make them more nutritious, I took out a lot of the fat, subbing butternut squash puree for it. I also subbed Stevia for part of the sugar, whole wheat flour for most of the all-purpose, and Neufchatel cheese for the full-fat cream cheese. Are these as good as the original? Probably not, but they're darned good, and carry a lot less guilt. As I've said before, there's no such thing as a healthful dessert, but I like the idea of cutting down and fortifying where I can.

One huge mistake I made: I put the peanut butter cups in the brownies before I baked them. You can do that with cookies, since they don't take very long to bake. But these take about 40 minutes, and that's too long for the PB cups; they melted. I am definitely going to make these again -- they're that good. But next time, I'll put the PB cups on the brownies during the last 5-10 minutes of baking, as Baking Blonde suggests.


Double Peanut Butter Cheesecake Swirled Brownies, Adapted
INGREDIENTS:
Brownie: 1 oz. semi-sweet chocolate
1 oz. bittersweet chocolate (or baking
chocolate, if preferred)
3/4 cup sugar
1/4 cup unsalted butter, soft
3/4 cup butternut squash (or pumpkin) puree
2 large eggs
1/2 cup + 2 Tbsp. whole wheat pastry flour (or white whole wheat)
1/3 cup natural cocoa powder
1/4 tsp. baking powder
1/2 tsp. sea salt
2 tsp. Creme de Cocoa
1 tsp. pure vanilla extract
Peanut Butter Cheesecake: 4 oz. Neufchatel cheese
1/2 cup creamy peanut butter
1/4 tsp. salt
1/3 cup sugar
1 large egg
1 tsp. pure vanilla extract
2 tsp. Creme de Cocoa
3/4 cup Reese's PB cups, chopped

Preheat oven to 350F. Line a square pan (8x8 or 9x9) with foil, letting the foil hang over the edges. Coat the foil lightly with non-stick cooking spray; set aside.
Place chocolate in a large mixing bowl and place the bowl in a pan of hot water over medium heat. Melt chocolate. Remove from heat and whisk in sugar, butter, and squash, combining well. Add the eggs, one at a time, whisking well after each addition. In a medium bowl, combine the dry ingredients and gradually whisk into chocolate mixture, taking care not to overbeat. Stir in the flavorings.
In a medium mixing bowl, combine cheesecake ingredients, except for egg and PB cups, mixing until smooth. Add egg and beat just till combined.

Spread about 2/3 of brownie batter into pan. Evenly drop 1/2 of cheesecake batter in dollops over brownie batter. Run a knife through both mixtures to slightly swirl. Dollop remaining brownie batter and cheesecake batter over swirled mixture. Run knife through the brownie and cheesecake dollops (taking care not to go through to the previous layer) to creat a swirled pattern. (Note: I didn't follow these instructions. I just put all the brownie batter in, then spooned the cheesecake batter in 3 strips over the brownie batter. Then I swirled that. Next time, I will follow the instructions above, as I think it will make for a better brownie. See the photo below, showing the three strips of cheesecake batter over the brownie batter. There is quite a bit of cheesecake batter in this recipe.)


Bake 35-45 minutes, or till a toothpick inserted near center returns with just a few crumbs. Don't overbake these. About 5-10 minutes before brownies are done, gently place the chopped Reese's over top of brownies. Yield: 16 brownies

Thursday, September 4, 2008

PUMPKIN SOUP

I found this recipe in an old cookbook that came with my first Cuisinart, back in the 70's. It's a James Beard recipe, and it's great. I added garlic, subbed fat-free half and half for part of the cream, and subbed Smart Balance for the butter. Other than that, I followed the recipe exactly. Actually, there wasn't too much to follow, because this is a pretty simple recipe. In this case, less is more, because this is a restaurant-quality soup.

Pumpkin Soup
Rating: 10 out of 10
3 Tbsp. Smart Balance buttery spread (or butter)
1 large sweet onion, chopped
2 small garlic cloves, chopped
1/2 tsp. curry powder
2 cups roasted butternut squash (canned pumpkin may be substituted)
1 tsp. sea salt
2-1/2 cups low-sodium chicken broth
1/2 cup heavy cream
3/4 cup fat-free half and half (Land o'Lakes recommended)
For Garnish: chopped fresh parsley

In a large heavy skillet or stock pot, heat the onion in the SB over medium heat till wilted, about 5 minutes. Add the garlic; cover; reduce heat to low and cook about 15 minutes, till onions are soft. Sprinkle with curry powder; cook an additional minute, then add squash and salt and stir together. Puree in a blender; pour into a saucepan with the broth cook over medium heat till ready to boil. Taste to adjust seasonings, adding more salt if needed. Add cream and half and half; reduce heat and just heat through. Garnish each serving with chopped fresh parsley, if desired. Yield: 4-6 servings

Wednesday, September 3, 2008

GEORGIA PEACH-AND-BERRY COBBLER

Our local Wal-Mart gave out copies of Southern Living Cooking School Make it Easy recipe book, and I was fortunate enough to get one. I'm always up for a new cobbler recipe, and this one sounded easy. I had fresh peaches I wanted to use, and blackberries were in my freezer. I'm not a huge fan of self-rising flour, though. I find it very salty and too heavy in baking powder. So I subbed some whole grain cornmeal for a little of the SR flour. I really like the flavors of this cobbler. Lemon rind (zest) brings out the flavor of the fruit. And it's not too sweet. Just right, actually. I haven't found a
cobbler recipe that I don't like yet. This one is another winner. I served it with Harris Teeter's Premium Summer Peach Ice Cream (no fillers, stabilizers, gums; just cream, milk, sugar, peaches and flavorings.)

Georgia Peach-And-Berry Cobbler 
Rating: 8 out of 10
Click for PRINTABLE PAGE

INGREDIENTS:
3 cups frozen or fresh sliced peaches
1 cup frozen or fresh blackberries or
raspberries
3/4 cup sugar (I subbed Stevia for part of the sugar)
1 tsp. cornstarch
1 tsp. grated lemon zest
1 cup self-rising flour
1/4 cup whole-grain fine-ground cornmeal
2 Tbsp. sugar
1 cup milk or fat-free half and half (I used FF H&H)
1/2 cup (1 stick) unsalted butter, melted

Preheat oven to 400F. (Note: It's not necessary to thaw the fruit if it's frozen.) Toss together peaches and next 4 ingredients; spoon lightly into a lightly greased 11" x 7 " or 9" x 9" baking dish. Combine flours and 2 Tbsp. sugar in a large bowl; make a well in center. Stir together milk and melted butter; add to dry ingredients, stirring just till moistened. Spoon evenly over fruit mixture. Bake about 1 hour or till crust is completely done. (I found that the crust browned before it was done underneath. This crust has considerably more liquid than other cobbler crusts, and no egg, so be sure to bake for the entire length of time so that you don't get a runny crust underneath. You may have to cover the crust with foil to prevent it from getting too dark.)

Tuesday, September 2, 2008

BLACK BEAN-AVOCADO SALSA

Homemade salsa is far superior to anything you can buy. For one thing, you get to control what ingredients go in. Example: I wanted to make a salsa without peppers, but with black beans, avocados, corn, tomatoes and tomatillas. I didn't want onions, I wanted green onions which, for me at least, are easier to digest in a raw state than regular onions. This turned out so-o-o-o good, and will definitely be on my list of faves. And it's healthful, too. Black beans, the main ingredient of this salsa, are a member of the power foods group. And the other ingredients are not exactly slouches, either. If you've never used tomatillas, you'll be pleasantly surprised. They kind of "hide" in this salsa; yet, they add something unique to the flavor. This is a great recipe, so give it a try.

Black Bean-Avocado Salsa
Rating 10 out of 10
INGREDIENTS:
1/3 cup chopped green onion
1 medium red, ripe tomato, chopped
1 medium green tomatilla, husked and finely chopped
1 Tbsp. minced fresh garlic
1 can black beans, rinsed and drained
1 cup corn (I used 1 fresh ear, briefly cooked and kernels scraped off.)
1 avocado, peeled, pitted, chopped
1/2 tsp. salt
1/4 tsp. pepper
2 Tbsp. cilantro, chopped
3 Tbsp. lime juice
2 Tbsp. extra-virgin olive oil

Combine all ingredients in a large bowl. Serve with crackers or tortilla chips.