Thursday, August 19, 2010

ROASTED PEACH BUTTER

003
If you’re looking for a way to use up peaches, here’s an easy recipe, almost effortless actually.  You can roast the peaches with a few ingredients till the liquid is just about evaporated, then puree it for a delicious peach butter that can be used in so many ways.  Try topping a slice of plain cheesecake with this wonderful peach goodness, as the photo above shows. 
How about a spoonful or two on your morning oatmeal, as in the following photo.
005
You could also make these delicious roasted peach butter spice cupcakes
roasted peach butter spice cupcakes
Or you can spread some on a bagel, slice of toast or waffle. 
Then again, you could simply eat the peach butter off a spoon. So-o-o good.
002

ROASTED PEACH BUTTER
Source:  Judy’s Kitchen
Rating:  10 out of 10
INGREDIENTS:
6 cups sliced fresh or frozen peaches, with juice
4-1/2 Tbsp. granulated sugar 
3 Tbsp. dark corn syrup 
3 Tbsp.  frozen apple juice concentrate, thawed
1 cinnamon stick

Heat oven to 375F.  Combine all ingredients in large roasting pan and bake 1-1/2 to 2 hours, or till peaches are beginning to caramelize and excess liquid evaporates.  Cool slightly.  Puree warm peaches in batches in blender or food processor.  Yield:  about 1-1/2 cups peach butter.

Monday, August 16, 2010

BLUEBERRY-COCONUT MUFFINS WITH PECAN CRUMB TOPPING

007
Last year, I made Coconut-Blueberry Muffins with Coconut Streusel Topping as an experiment, using coconut oil and coconut flour.  They were delicious.  This year, I experimented again, using more coconut flour, whole wheat flour and coconut oil.  Instead of making a coconut streusel topping, I tried pecans in the topping.  I liked both, but the pecan topping covers the muffin better after it’s baked.  The coconut streusel separated slightly as the muffin baked.  009
My only disappointment with this muffin is that some of the crumb topping falls off as you eat, making the muffins a bit messy.  The flavor, however, is wonderful, and the texture is moist, light and tender.  Considering that I increased the coconut flour and the whole wheat flour, this is pretty amazing.  If the crumb topping weren’t so messy, this muffin would rank as high as my current top-rated blueberry muffin by  America's Test Kitchen005
Blueberry-Coconut Muffins with Pecan Crumb Topping
Source:  Judy’s Kitchen
Rating:  9.5 out of 10
PRINTABLE PAGE
INGREDIENTS:
1/4 cup organic extra-virgin coconut oil
2/3 cup sugar (I used 1/3 cup sugar + 1-1/2 tsp. NuNaturals Stevia)
1 large egg
1/4 cup buttermilk (I used 1/4 cup 2% milk + 3/4 tsp. cider vinegar)
6 Tbsp. fat-free Greek yogurt (I used Yoplait honey vanilla)
1/2 tsp. pure vanilla extract (I used my homemade vanilla)
1 Tbsp. coconut-flavored rum (or regular rum)
1/2 cup white whole wheat flour
1/2 cup + 2 Tbsp. unbleached all-purpose flour
1/4 cup coconut flour
3/4 tsp. baking powder
1/4 tsp. baking soda
1/8 tsp. sea salt
1-1/2 cups blueberries, divided use

Topping:  1/4 cup toasted pecans, finely chopped
1/2 cup white whole wheat flour
1/4 cup sugar (I used 2 Tbsp. sugar + 3/4 tsp. NuNaturals Stevia)
1/4 tsp. baking powder
1 Tbsp. butter, melted

Heat oven to 425F.  Spray a 12-cup muffin tin with nonstick cooking spray, or line with paper cups.  In large bowl, whisk together oil and sugar till smooth.  Add egg, milk, yogurt, vanilla and rum and whisk till smooth.

In small bowl, combine flours, baking powder, baking soda and salt.  Stir in 3/4 cup blueberries, then fold this mixture into the wet ingredients.  Do not over mix.  Spoon batter into prepared pan, using about 1/4 cup batter for each muffin.  Press remaining blueberries onto tops of muffins, pushing in slightly. 

In small bowl, combine  topping ingredients with fork or fingers.  Sprinkle over muffin tops.
002
Place muffins in oven.  Close door.  Reduce heat to 350F.  Bake about 20 minutes, or till a wooden pick inserted in center of muffins returns with just a few crumbs.  Cool in pans 5 minutes, then transfer to wire rack to finish cooling.  Yield:  12 standard-size muffins
004

Friday, August 13, 2010

CHICKEN WITH GINGERED APRICOT SAUCE

018

Grilling out in the summertime is fun and easy.  It’s  great not to have a lot of pots and pans to clean up.  But we had a cool snap recently, and I couldn’t wait to make something different.  My mouth had been watering for this dish, made from a recipe I found on epicurious.com and adapted.  It’s one of those rare recipes that both hubby and I like.  So nice not to have to cook two separate meals.  There was just one extra pot for his peas, since he doesn’t eat broccoli or pea pods.  (I thought of cooking his peas with my broccoli, but just knew he would taste the broccoli, or at least he would think he tasted it.) 

011 (2)

Most Asian-inspired dishes have more sugar than I like.  This one, however, is different.  It’s not icky sweet.  Instead of preserves, I used Smucker’s Apricot Simply Fruit.

  019

(If you prefer more sweetness, just use any apricot preserves.)  There are some subtle but nice flavor layers from the coriander mixed with the flour,  and from the ginger, soy sauce, apricot preserves, garlic and green onions in the sauce.   And, even though there are more pots and pans than I like, we get two meals out of this.  So the second night is just warming up the leftovers.)  This is a recipe that we will enjoy over and over.

CHICKEN WITH GINGERED APRICOT SAUCE
Adapted from epicurious.com
Rating:  9 out of 10
Click for PRINTABLE PAGE

INGREDIENTS: 
3 Tbsp. flour
1/2 tsp. ground coriander
2 large chicken breast halves, halved and pounded thin
3/4 tsp. sea salt
1/4 tsp. black pepper
1 Tbsp. + 1 tsp. unsalted butter, divided use
1 Tbsp. extra-virgin olive oil
4-6 green onions (about 1/2 cup sliced)
1/2 tsp. garlic, finely chopped
1/2 – 3/4 cup low-sodium chicken broth
2 tsp. cornstarch
2 Tbsp. no-sugar-added apricot preserves
1 tsp. low-sodium soy sauce
1-1/2 tsp. grated fresh ginger
4-5 drops California hot sauce

In small resealable bag, combine flour and coriander.  
008

Pound cutlets between sheets of wax paper to an even thickness. 
009 

Season with salt and pepper. 
010

Dip each cutlet in flour, one at a time, shaking off excess. 
011 

Heat large heavy skillet on medium heat.  When pan is hot, add 1 Tbsp. butter and the oil.  Add chicken and saute till cooked through, about 4 minutes per side. 
013 
Transfer chicken to platter and tent with foil to keep warm, or place in 200F oven. 

Add half of the green onions and garlic to drippings in skillet and stir over medium-high heat 1 minute, scraping up any browned bits.  Whisk 1/2 cup broth and cornstarch in small cup or bowl till smooth.  Add to skillet; bring to boil, stirring constantly. 
015

Add preserves, soy sauce, ginger and hot sauce. 
016

Boil till thickened to sauce consistency, about 1-2 minutes, adding more broth if necessary.  Pour over chicken.  Garnish with remaining green onions.  Yield:  4 servings
 010 (2)

Wednesday, August 11, 2010

EASY SUMMERTIME GRILLED DINNER

013
When it’s really, really hot, who feels like cooking?  Not me.  Just a simple grilled sandwich keeps me happy.   A boneless chicken breast, tossed with olive oil, salt and pepper, then grilled with onion slices and sweet green or red pepper, makes a delightful sandwich topped with lettuce and freshly sliced tomato.  Basil pesto-mayonnaise or mayo mixed with sundried tomato pesto are both nice on the bun.  Easy peasy.
Grilled Chicken and Peppers Sandwich
Source:  Judy’s Kitchen
Rating:  8 out of 10
PRINTABLE PAGE
INGREDIENTS: 
1 boneless skinless chicken breast half
2 Tbsp. olive oil, divided
1-1/2 tsp. sea salt, divided
1/2 tsp. black pepper, divided
1 –2  (1/2”) sweet onion slices 
1/2 sweet green or red pepper cut into 2” strips
2 slices from a large tomato, 1/4” - 1/2” thick 
4 pieces of lettuce
pesto mayonnaise
2 Kaiser rolls, split, or other roll of choice
optional:  2 slices Asiago or mozzarrella cheese

Heat grill to medium-hot (about 400-425F).  Clean and season grill grates.  Pound the fat side of the chicken to make it a more uniform size (this will help it cook more evenly).  Rub chicken with 1 Tbsp. oil, 3/4 tsp. salt and 1/4 tsp. pepper.  Rub onion and pepper slices with 1 Tbsp. oil, 3/4 tsp. salt and 1/4 tsp. pepper. 
003 
Place chicken and veggies on grill.  Close lid.  Cook about 5 minutes; open lid; turn veggies and chicken over. 
008 
Close lid.  Cook additional 5 minutes, or till chicken is cooked through and veggies are tender.  (Veggies will probably be done before the chicken, and can be removed to a bowl, covered, to keep warm.)  About 1 minute before chicken is done, toast roll on coolest part of grill. 

Slice chicken on diagonal (like a London Broil); place slices on roll bottoms.  Top with cheese (if using), peppers and onions, then tomato and lettuce.  Spread tops of rolls with pesto mayonnaise (just mix some sundried tomato pesto or basil pesto into some mayo)
010
Yield:  2 sandwiches

Monday, August 9, 2010

SALTED OATMEAL-CRANBERRY-WHITE CHOCOLATE CHUNK-PECAN COOKIES

I have to be honest.  Salt on cookies sounded too weird to me.  I mean, how could salt on a sweet cookie taste good?  But I decided to try it, and I'm converted.  These cookies would be perfect if they were just crispier -- they are a bit on the soft side.  But the salt keeps bringing you back for more.  You can make the cookies crispier if you bake them longer.  If I make these again, I think I'll take one egg out to crisp them up more.  No matter, they are delicious........Get the recipe here...

Friday, August 6, 2010

MIRACLE-MARINATED GRILLED FLANK STEAK

Beef has been on my taboo list for several years, though I do occasionally enjoy one of our delicious dry-aged rib steaks.  I'm trying to eat more seafood, always wild caught, but even that can be risky because of mercury and pollutants.  Imagine how thrilled I was to learn of the health benefits of eating grass-fed beef.  It's   actually good for you.  It lowers cholesterol and has less fat and calories than grain-fed beef.  Amazingly, it contains Omega 3 fats -- the good fats -- because they're in the grass that the cattle eat.  And because they graze freely instead of being penned up, they're healthier.  But I never expected to find grass-fed beef in our little Southeast coastal town of New Bern.

Get the recipe for Miracle-Marinated Grilled Flank Steak.

Wednesday, August 4, 2010

IS YOUR GRILL READY?

Do you start your grill just in time to throw some food on it?  What about all those bits of burned food left from the last several times you cooked?  Are they still there?  Does food stick to the grill grates, or does it come off as if it’s a nonstick surface?  Here’s a little tutorial on how to prepare your grill for cooking.  (Although I use a gas grill, these rules apply to charcoal grills as well.)
1.  Start your grill at least 1/2 hour before you need it.  Before you start it, lay a piece of heavy-duty aluminum foil on the grill grates.  Start it up, then close the lid.  Let the grill heat for a good 20 minutes.  The aluminum foil will speed up the process of burning off the bits of food on the grates.  You can see in the photo below that my aluminum foil is in pieces.  Not to worry, it still works.  Eventually you have to throw the foil out, but you can reuse it many times.  (I keep it under the grill, folded.) 
002
2.  After 20 minutes at high heat, you should have ashes on top of your grill grates.
004
3. The grill should scrape clean easily now.  Use a stiff-wired brush, which you can find at Wal-Mart or Lowe’s, or any where grill supplies are sold.  Eventually, you’ll need to replace the brush as you wear down the bristles, but it will take a while, depending on how much you use your grill.
005
3.  Use old frying oil and a paper towel to season the grates.  Take a whole sheet of paper towel (Not one of those skinny choose-a-size sheets.  If you use those, you’ll need two, not one.) 
004
Fold in half.
005
Fold in half again.
006
Now fold the other way in half.
007
Fold in half again.
008
I hope you have some very long-handled tongs.  If not, use whatever tongs you have.  The tongs will hold the ends of the folded towel in place.  Dip it in oil.  Really saturate it.  (I use leftover used frying oil, rather than using fresh vegetable oil.) 
4.  Rub the grill grates with the oil-soaked towel, back and forth just twice.  (Any longer, and you’ll get pieces of shredded paper towel.)  If the grill is really hot, you may get some flareups, so be careful.  I like to use flame-proof mitts to protect my skin.  Your grates will probably smoke a little.
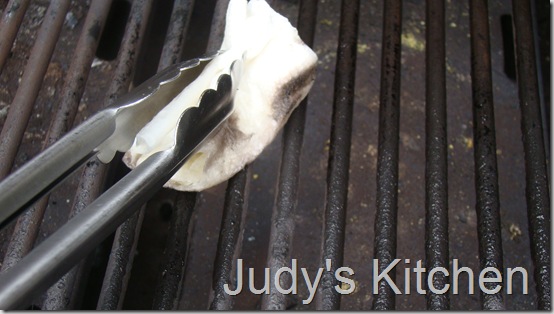
006
5.  Cover the grill while you get your food.  You now have an almost-nonstick cooking surface.
The bad news is that you have to do this every time you grill if you want a nonstick surface. 
The good news is that it is so much easier to grill.  You’ll have less and less food that sticks. 
And even better news is that you are recycling old frying oil that you didn’t want any way.